想象这样一种场景,当你加载一个3D地球模型,地球上分布每个国家,当你点击其中一个国家的时候,当前国家的区域进行高亮展示。
场景看起来挺简单,思路和具体实现如何展开?借此实现路径,本文的目的是剖析Threejs/WebGL 实现路径,达到融会贯通。
创建场景
这部分内容纯API
1.场景渲染器
const renderer = new THREE.WebGLRenderer({ antialias: true, canvas });
开启抗锯齿,其他参数配置:https://threejs.org/docs/#api/zh/renderers/WebGLRenderer
2.设置相机
https://threejs.org/docs/?q=PerspectiveCamera#api/zh/cameras/PerspectiveCamera
const fov = 60;
const aspect = 2; // the canvas default
const near = 0.1;
const far = 10;
const camera = new THREE.PerspectiveCamera(fov, aspect, near, far);
camera.position.z = 2.5;
设置视锥体,模拟人眼。
其中摄像机视锥体垂直视野角度,从视图的底部到顶部,以角度来表示,默认值是50,这里设置为60,角度更大;
aspect代表宽高比,定义为2,则是一个一个长方形,默认为1;当前场景区别不大。
3.增加旋转控制
const controls = new OrbitControls(camera, canvas);
controls.enableDamping = true;
controls.enablePan = false;
controls.minDistance = 1.2;
controls.maxDistance = 4;
controls.update();
//
controls.addEventListener("change", rerender);
4.增加场景并设置背景色
const scene = new THREE.Scene();
scene.background = new THREE.Color("#246");
创建地球轮廓
1.创建球体
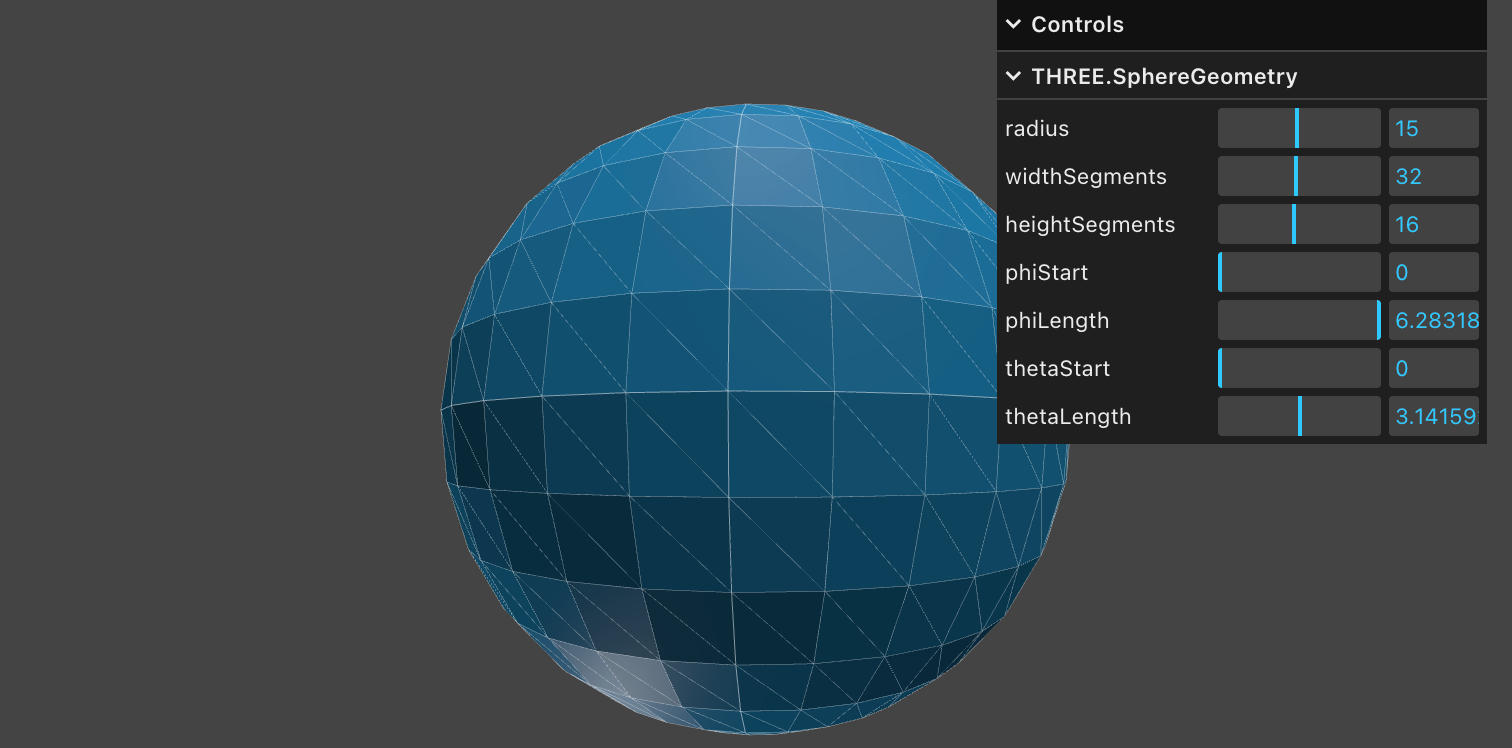
const geometry = new THREE.SphereGeometry(1, 64, 32);定义半径为1,因为相机的高度本身就是2.5,所以设置为1,整体的大小已经可视。
2.加载纹理图
const loader = new THREE.TextureLoader();
const texture = loader.load(
  "https://threejs.org/manual/examples/resources/data/world/country-outlines-4k.png",
  render
);
const material = new THREE.MeshBasicMaterial({ map: texture });
MeshBasicMaterial是一种不受光照影响的简单纹理图。说白了就是糊在几何体上。
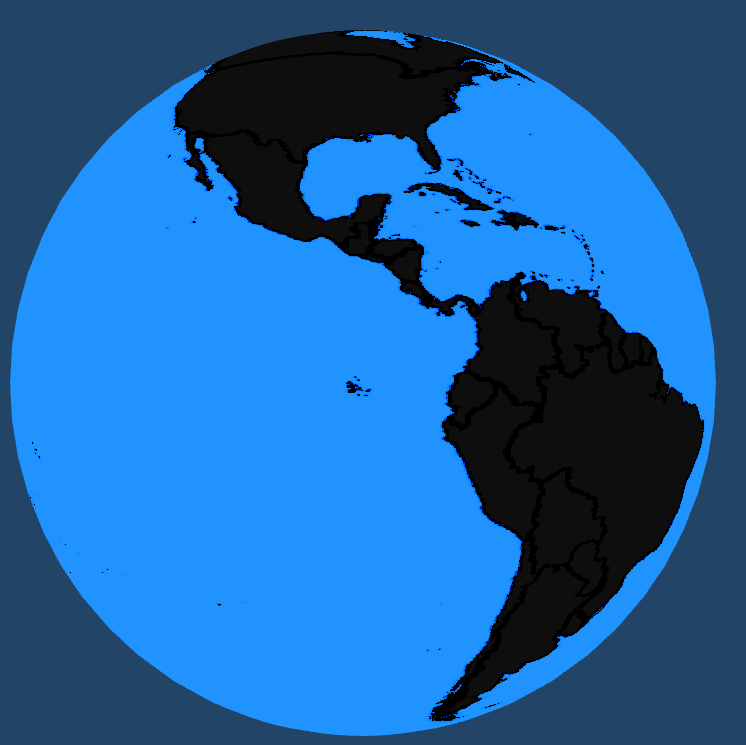
至此大概能能够看到这个样子了
地球轮廓染色
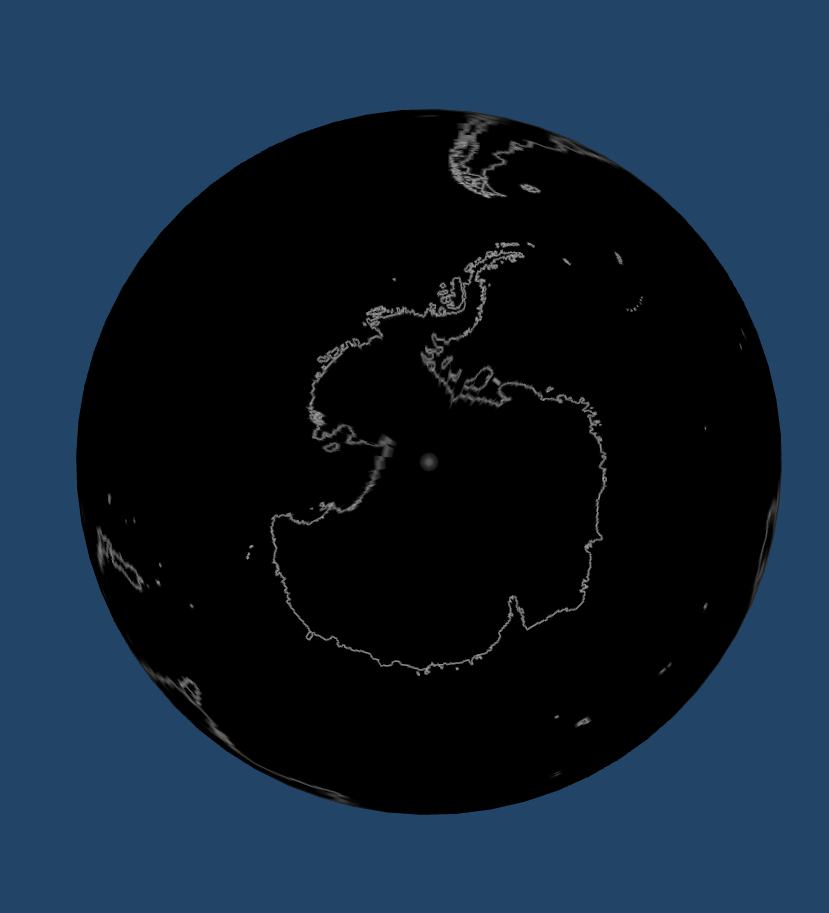
有了这个轮廓图,接下来如何给这个轮廓图染色,例如我想把海洋的部分染成蓝色。原理是找到和轮廓图一样大小的染色图,基于每个像素点的坐标的信息,判断当前应该染成什么样的颜色。
例如我们的轮廓图取自:https://threejs.org/manual/examples/resources/data/world/country-outlines-4k.png
同时对应一张染色图:
https://threejs.org/manual/examples/resources/data/world/country-index-texture.png
而这张染色体的像素点使用每个像素点的RG标识当前的国家信息。
1.使用一个纹理数据存储每个国家对应的颜色值,其中0位置存储海洋颜色
const paletteTextureWidth = 512;
const paletteTextureHeight = 1;
const palette = new Uint8Array(paletteTextureWidth * 4);
const paletteTexture = new THREE.DataTexture(
  palette,
  paletteTextureWidth,
  paletteTextureHeight
);
paletteTexture.minFilter = THREE.NearestFilter;
paletteTexture.magFilter = THREE.NearestFilter;
paletteTexture.colorSpace = THREE.SRGBColorSpace;

const selectedColor = get255BasedColor("red");
const unselectedColor = get255BasedColor("#444");
const oceanColor = get255BasedColor("rgb(100,200,255)");

for (let i = 1; i < 512; ++i) {
  setPaletteColor(i, unselectedColor);
}

setPaletteColor(0, oceanColor)
paletteTexture最终要传给着色部分进行使用。
2.有了每个国家对应的颜色之后,如何确定当前模型中,具体位置对应的国家呢?
加载前文提到的包含国家信息的纹理图
const indexTexture = loader.load(
  // "https://threejs.org/manual/examples/resources/data/world/country-index-texture.png",
  './texture.png',
  render
);
indexTexture.minFilter = THREE.NearestFilter;
indexTexture.magFilter = THREE.NearestFilter;
3.将此纹理在着色过程中基于顶点坐标动态比对,进行颜色修改。则需要修改Threejs着色器。使用ThreeJS的回调进行着色器的修改。
material.onBeforeCompile = function (shader) {
  fragmentShaderReplacements.forEach((rep) => {
    shader.fragmentShader = '我需要修改的内容,同时需要注意保留原有的着色器内容';
  shader.uniforms.paletteTexture = { value: paletteTexture };
  shader.uniforms.indexTexture = { value: indexTexture };
  shader.uniforms.paletteTextureWidth = {
    value: paletteTextureWidth,
  };
};
4.追加片元着色器部分内容,片元着色器为着色的过程。可以进行颜色修改。
需要注意原本Threejs已有着色器代码,需要保留进行替换。
#include <common>
uniform sampler2D indexTexture;
uniform sampler2D paletteTexture;
uniform float paletteTextureWidth;

#include <color_fragment>
{
    vec4 indexColor = texture2D(indexTexture, vMapUv);
    float index = indexColor.r * 255.0 + indexColor.g * 255.0 * 256.0;
    vec2 paletteUV = vec2((index + 0.5) / paletteTextureWidth, 0.5);
    vec4 paletteColor = texture2D(paletteTexture, paletteUV);
    // diffuseColor.rgb += paletteColor.rgb;   // white outlines
    diffuseColor.rgb = paletteColor.rgb - diffuseColor.rgb;  // black outlines
}
这里是最终的ThreeJS的着色器的代码
ThreeJS着色器代码
uniform vec3 diffuse;
uniform float opacity;
#ifndef FLAT_SHADED
varying vec3 vNormal;
#endif

#include <common>
uniform sampler2D indexTexture;
uniform sampler2D paletteTexture;
uniform float paletteTextureWidth;

#include <dithering_pars_fragment>
#include <color_pars_fragment>
#include <uv_pars_fragment>
#include <map_pars_fragment>
#include <alphamap_pars_fragment>
#include <alphatest_pars_fragment>
#include <alphahash_pars_fragment>
#include <aomap_pars_fragment>
#include <lightmap_pars_fragment>
#include <envmap_common_pars_fragment>
#include <envmap_pars_fragment>
#include <fog_pars_fragment>
#include <specularmap_pars_fragment>
#include <logdepthbuf_pars_fragment>
#include <clipping_planes_pars_fragment>
void main() {
    vec4 diffuseColor = vec4( diffuse, opacity );
    #include <clipping_planes_fragment>
    #include <logdepthbuf_fragment>
    #include <map_fragment>

    #include <color_fragment>
    {
        vec4 indexColor = texture2D(indexTexture, vMapUv);
        float index = indexColor.r * 255.0 + indexColor.g * 255.0 * 256.0;
        vec2 paletteUV = vec2((index + 0.5) / paletteTextureWidth, 0.5);
        vec4 paletteColor = texture2D(paletteTexture, paletteUV);
        // diffuseColor.rgb += paletteColor.rgb;   // white outlines
        diffuseColor.rgb = paletteColor.rgb - diffuseColor.rgb;  // black outlines
    }

    #include <alphamap_fragment>
    #include <alphatest_fragment>
    #include <alphahash_fragment>
    #include <specularmap_fragment>
    ReflectedLight reflectedLight = ReflectedLight( vec3( 0.0 ), vec3( 0.0 ), vec3( 0.0 ), vec3( 0.0 ) );
    #ifdef USE_LIGHTMAP
    vec4 lightMapTexel = texture2D( lightMap, vLightMapUv );
    reflectedLight.indirectDiffuse += lightMapTexel.rgb * lightMapIntensity * RECIPROCAL_PI;
    #else
    reflectedLight.indirectDiffuse += vec3( 1.0 );
    #endif
    #include <aomap_fragment>
    reflectedLight.indirectDiffuse *= diffuseColor.rgb;
    vec3 outgoingLight = reflectedLight.indirectDiffuse;
    #include <envmap_fragment>
    #include <opaque_fragment>
    #include <tonemapping_fragment>
    #include <colorspace_fragment>
    #include <fog_fragment>
    #include <premultiplied_alpha_fragment>
    #include <dithering_fragment>
}
这里只关注自身追加的逻辑部分,基于vMapUv顶点着色器传过来的点位,解析到轮廓中具体位置的RG信息,从而确定当前的国家编号。基于当前编号,从调色板纹理即paletteTexture中进行取值,由于调色板纹理是一维的,所以高度取0.5,u坐标为(index + 0.5) / paletteTextureWidth。从而取到调色板对应的纹理颜色,然后进行颜色调整,即可实现对地图的染色。
另外关于颜色的处理,轮廓纹理 (texture) 是白底黑线,diffuseColor 初始是轮廓纹理的颜色。如果 paletteColor 是国家颜色,国家颜色 - 白色(1,1,1) = 负值 (会被截断为0,黑色);国家颜色 - 黑色(0,0,0) = 国家颜色。
到目前为止,可以把海洋染成蓝色了,其他位置为#444
点击侦测
基于当前点击的角色进行国家判断。
1.创建取色场景
const pickingScene = new THREE.Scene();
pickingScene.background = new THREE.Color(0);
const pickingMaterial = new THREE.MeshBasicMaterial({
map: indexTexture,
});
pickingScene.add(new THREE.Mesh(geometry, pickingMaterial));
2.当点击的时候,确定当前的点在canvas中的坐标
const rect = canvas.getBoundingClientRect();
return {
    x: ((event.clientX - rect.left) * canvas.width) / rect.width,
    y: ((event.clientY - rect.top) * canvas.height) / rect.height,
    };
3.基于当前点击的位置,设置副相机视角,只展示当前位置的像素点
const pixelRatio = renderer.getPixelRatio(); // 获取设备像素比

// 设置相机视口偏移,只渲染鼠标下的单个像素
camera.setViewOffset(
    renderer.getContext().drawingBufferWidth,  // 渲染器绘图缓冲区的完整宽度
    renderer.getContext().drawingBufferHeight, // 渲染器绘图缓冲区的完整高度
    (cssPosition.x * pixelRatio) | 0,         // 拾取矩形的 x 偏移 (乘以像素比并取整)
    (cssPosition.y * pixelRatio) | 0,         // 拾取矩形的 y 偏移
    1,                                       // 拾取矩形的宽度 (1像素)
    1                                        // 拾取矩形的高度 (1像素)
    );
4.设置一个一像素的渲染目标
this.pickingTexture = new THREE.WebGLRenderTarget(1, 1); // 1x1 像素的渲染目标
this.pixelBuffer = new Uint8Array(4); // 用于读取像素数据的缓冲区 (RGBA)
5.将内容渲染并进行提色,基于提色转换为ID
// render the scene
renderer.setRenderTarget(pickingTexture);
renderer.render(scene, camera);
renderer.setRenderTarget(null);
// clear the view offset so rendering returns to normal
camera.clearViewOffset();
//read the pixel
renderer.readRenderTargetPixels(
    pickingTexture,
    0, // x
    0, // y
    1, // width
    1, // height
    pixelBuffer
    );

const id =
(pixelBuffer[0] << 0) |
(pixelBuffer[1] << 8) |
(pixelBuffer[2] << 16);

return id;
到此则完成一种图形交互形式,基于颜色进行信息存储。